This last be my last post on blogger!
As I have written about before my website was taken down due to lack of activity so i thought i would try something a little different and create a WordPress site.
Now thinking this over, I decided to move my blog to WordPress in corporate into my new site.
So Thank you supporting my blog here and please come and check it out with new look at 99redbooleans.wordpress.com
thank you
Tuesday, 5 August 2014
Saturday, 26 July 2014
Tuesday, 22 July 2014
My First App!
Over the last few days I have been playing around with App Inventor 2.
With a Google account you can create android app using a scratch type block code system.
Instead of writing the code out you place blocks together to gain the action your require.
I have just finished building my version of the first tutorial video. My app is now available on Google Play here.
Called Talk to Me, its a text to speech application. Type in a word or phrase and it returns it out loud. Very basic and simple but fitting for my first ever app. I made a few tweaks with a pitch bar to change the pitch of her voice.
I'm proper proud of myself. I know some people with be thinking well anyone could make that and yes they could be that to point it so easy I highly recommend people to try it out and download my app of course.
Download my app..... oh and give your phone a shake lol.
Sunday, 20 July 2014
makegameswith.us
I have just completed the course on cloning flappy bird, which is a the free course.
The site revolves around there summer and on-line academies. The latter is a $99 course running from the 23rd June till 10th August.
No word of future course as this course has already started. I haven't tried to enrol to see what happens, it might give you other option at that point but doesn't look like it.
The summer academy is an 8 week course running in Palo Alto, California or New York City. Price is *cough* $5000 *cough*
Bit out of my range me thinks!
They offer a free* iOS Game Development course. I put "free*" for two reasons. The first is the obvious one, you need a mac that runs OS X Mavericks. Secondly the games you develop can be sold on the app store, ported to Android and they help you with artwork but take 30% of your iOS sales and 50% of Android. Free cost wise but you paying in the end. If you don't have a Mac your paying alot, you'll need to buy one!
Course is delivered well, worth checking out as a brief introduction to objective c but no content rich unless you have a mac but I don't.
Just a word about Code.org
I posted the other day about how I had finished the intro to computer science course of code.org.
Some thing that I didn't realise was the amount of courses available but they are links to external sites. Some paid some free but code.org is a vast array of computer science related content and we'll worth a look for anyone not just kids. Each course has an age who its recommended for.
Currently I'm looking at an iOS game development game course with makegameswith.us.
Well worth looking at!
Thursday, 17 July 2014
Completed Code.org's "Intro to Computer Science"
Today i managed to complete the course. Through a lack of time and the nature of the site this hasn't been top of my priority.
Couple of things struck me about code.org on how useful a tool it is for children.
It is without a doubt aimed at children but the course itself has the necessary component for coding.
I'm going to try and get my girls on it and see if they can work it out.
Couple of things struck me about code.org on how useful a tool it is for children.
It is without a doubt aimed at children but the course itself has the necessary component for coding.
I'm going to try and get my girls on it and see if they can work it out.
Sunday, 13 July 2014
My Website update
For anyone trying to get onto my site current its is down, i hadn't noticed part of the terms of service with 5gbfree.com is that you had to keep its active and i had not made any additions to it for a bit so they cancelled my account. i'm hoping ti get a domain sorted soon so we'll be back up asap.
Thanks
Thanks
Saturday, 12 July 2014
Udacity update
I haven't to well over the last couple of days. I've had a chest infection and have a couple of days off work trying to recover. During these days I have have mostly been sleeping but there is only so much I can do before my back start to hurt and I feel worse than when i went to bed.
For the rest of the time i have been sitting at my laptop on Udacity.
I wrote a review on Udacity, when I did my reviews of the coding tutorial sites not long after I started this blog. I was impressed with how the content was delivered, the fact I could do most of it on my iPad but the price for a paid course was huge compared to the other site I had reviewed.
Anyway I received an email to tell me I could now do my courses on my phone through the new android app. I thought "cool" so I checked it out and it does offer a great on the move option for learning. It's presented very well through a Samsung Note 3 that I have. A Few months back I sat down and finished lesson one and some problem sets of the intro course. So when I went on the app I thought i'd look at what else was available. I found a couple of interesting courses and one was about app building in Salesforce. So I sat down and worked through the courseware and I enjoyed it. It wasn't quite what I expected but still well delivered course and very informative.
Think i expected it the be building mobile applications but i would of realized it wasn't if i had have read the course data properly.
Udacity
Udacity again takes a different approach to teach coding. A different but similar approach. (confused?)
First I want to get something off my chest about Udacity.

They offer a variety of courses in various coding related topics, I personally
am working my way though the "intro to computer science". Udacity employs free course-ware and paid enrolment. the difference illustrated in the below picture.

So you get in class projects, tutor support etc etc. Udacity charges per course per month, course have a length but as the next picture shows:

Wow, yes that $150 per month. now I understand that the guy teaching is a professor of computer science at Stanford university but I don't want to pay Stanford tuition fees.
I can't fault how the lesson are delivered though. This is what I was talking about earlier that there approach it different but similar.
The tutor( I forget his name ) (on the "intro to computer science" course) present his lessons though an interactive white board. Writes with his pen and this translates to the screen your viewing through. Very clever way to do it in fairness, I really like the way he writes a quiz on the board and it allows user interaction.
Another cool feature is they have an iPad app which allows full access to the site content. Hooray! This is a god send, for this reason alone I will complete as much of the free content as possible on my iPad.
Thursday, 10 July 2014
New laptop update
I went ahead and purchased a
refurbished Lenovo ThinkPad from eBay courtesy of 3000rpm computers.

I have to say I’m very impressed with
it, the laptop itself is a nice size and weight, the keyboard feels
nice, not to mechanical or unresponsive to touch its just right and
the performance is awesome. Boots from its 120gb SSD in about 10secs.
Applications load instantly, no waiting for your web browser.
Very impressed, as with refurbished
laptops it only has a 30mins guarantee on battery life and its like
it know it, as it won't last any more than 30mins!
But I used it plugged in most of the
time anyway plus I may look into getting a new battery for in the
future.
I've not got round to putting Ubuntu on
it yet, not sure if I will but we'll see.
I have however been playing StarCraft 2
on it quite a lot and it works flawlessly.
All in all a good purchase.
Another good purchase was a mouse i purchased from eBay.

For £1.98 bargin and great bit of kit.
Monday, 23 June 2014
laptop new life
Just a quick post to say I have resurrected my girlfriend old laptop by installing Ubuntu over windows.
I'm writing this on LibreOffice because my spelling and grammar are appalling. Cant spell appalling so thank goodness for spell check.
I really like the set-up and lay out of Ubuntu, its super easy to install and set-up. Boot rally fast and on this laptop that saying something but this thing is ancient I mean there were Romans on the earth when this thing was made.
Its a really breath of fresh air over the mundane style that is Microsoft windows. it never really changed has it, same old blues and task-bar.
I wrote my last post on this laptop too, and I'm really impressed so far, I've installed wine as I cant install notepad++ which works great. I'm going to test as much as possible over the next coming weeks and get back to you about it performance.
Sunday, 22 June 2014
Real Racing 3
Something a little
different, at the back end of last year I started writing a blog
about how I want to improve my kill/death ratio on call of duty.
That then turned into a gaming blog as I discovered the world of
professional gaming. I stopped writing it because I have a terrible
memory and most of all I get forced on something and it tends to
consume me. I started with call of duty then I found star-craft 2,
then I'll get frustrated and put it down and find something else.
Anyway strictly
speaking this blog will be about me and my journey coding but I’ll
put the odd post in about something else and at the moment I’m
really enjoying Real racing 3 at the moment.
Its a mobile racing
game with game play and graphics to rival gran turismo or forsa. It
really is that good and a mobile game!
I'm playing it while
I write this, do a race write a bit more, do race and write a bit
more.
I was talking to
some guys at work about it the other day and getting them to take a
look, its free also did I mention that. A mobile game that rivals
gran turismo and its free!
While I’ve writing
this I’ve been playing(until this bit, my battery died!) and
looking online and I found a review by eurogamer that rated it 3/10!
WHAT!!! are you mad!
This game is fantastic! As you read through the review he talk about
how good the game is but he main issue is the in app purchases. And
yes the game doesn’t have in app purchases but you don’t need
them. He talks about the amount to upgrade and service you vehicles.
Well durr! This is a necessary part of owning a car and it cost
money.
I don’t know what
some people except when they download a FREE app, it will have two
things, Ad's and/or in app purchases. How do they except the company
that has spend I don't know how money developing this game to make a
profit if its free!
Some people need to
wake up! Rant over!
If you like racing
game I strong recommend Real Racing 3. I have never spend anything on
this game I have got to level 47, have over 4 million worth of cars
in my in game garage and completed 5 race series without spending
anything on it! Not a penny! Its more than possible, if you don’t
want to spend then don’t but give it a go its a great game.
Thursday, 19 June 2014
update
After my frustrations with JavaScript, I have turned a
corner. Watching the Tutorial I linked to in my last post, I have been able to
understand a little bit more. I have now progressed on through my JavaScript
course on codecademy. Not finished it yet but I’m getting on a lot better with
it.
I edited my website a couple of times since uploading,
changing so layout and adding bits of content. I have a couple of other thing
in my head to put on there and will do when I get round to it.
I had a bit of look at treehouse the other day after seeing
an advent. I wasn’t overly impressed I searched for reviews and the content
looks limited and interface not overly friendly but one way to find out is take
the free trial. Which I will do when I have the opportunity to take advantage
of it.
Friday, 13 June 2014
Bucky's Javascript Tutorials
I was on YouTube looking for JavaScript tutorials to help support my codecademy course. I written about issues I've had with grasping JavaScript.
On the two occasions where i have been stuck, these tutorials have really helped me out. 40 videos in total cover JavaScript topics.
Check it out at buckysroom.org
On the two occasions where i have been stuck, these tutorials have really helped me out. 40 videos in total cover JavaScript topics.
Check it out at buckysroom.org
Wednesday, 11 June 2014
My Website
Check out www.jwatkins.5gbfree.com
Its my website showing currently what i have learnt in HTML/CSS so far.
Its my website showing currently what i have learnt in HTML/CSS so far.
Tuesday, 10 June 2014
Notepad++
The first code
editor I'm going to review for pc/windows is Notepad++.
This editor I downloaded on to my girlfriend laptop along with sublime to see how thing go and I really like how this work.
If I'm honest I used sublime exclusively until its started to tell me I needed to register. Sublime is nice but the registration is not happening at 70 quid!
I moved to notepad++ and I'm glad I did, Notepad++ is bright, user friendly, feature rich and generally nice
to use.
As I said in my last post, I can’t
offer anything of use to anyone who code regularly but as a beginner I think
notepad++ is one of the nicest to use.
Extremely easy install and its
Free! Can’t get much better than that. Download it here.
Although notepad++ doesn’t have a preview window you can
easy save (ctrl+s) and run in browser (ctrl+alt+shift+r for chrome). Great for
checking you changes. I have only used it for HTML so I’m unsure on it uses for
python for example although it is compatible.
Its worth a shot lol
Sunday, 8 June 2014
My new review series.
Welcome,
Updated my last post to make it look a lot better, posted via Blogger for android and haven't worked out if you can edit font etc.
Updated my last post to make it look a lot better, posted via Blogger for android and haven't worked out if you can edit font etc.
Anyway the first post of the new series. I'll first outline was I'm going to review and then a new addition a mobile editors.
(I'm currently sat in lazer-force Leicester at a kids party, wife says I'm not allowed to play. Needed something to past the time.)
(I'm currently sat in lazer-force Leicester at a kids party, wife says I'm not allowed to play. Needed something to past the time.)
So which editors I'll review,
1.Notepad++
I was going to review more than just this one, but I was thinking about what I could write about than I decided I'm completely under qualified to write about anything of any use to any body who uses code editors proficiently. So I'm going to write about Notepad++ and why I like it.
I was going to review more than just this one, but I was thinking about what I could write about than I decided I'm completely under qualified to write about anything of any use to any body who uses code editors proficiently. So I'm going to write about Notepad++ and why I like it.
Which mobile editor? Although I think I have more to offer here, I only have an Android phone and can't provide a decent insight so I'll talk about the one I use.
1.Webmaster pro (only reviewing the pro version as I bought this prior to writing this series.)
New laptop
I'm have been looking at code editors for my new laptop. Buying a new laptop very exciting!
I was looking at either a Samsung series 7 ultra book or and macbook air. Both very nice laptop full of tech, good speed and plenty of power but both about a grand!
Looked at a couple of other options but still felt drawn to the macbook air. If I want to develop apple apps then mac is a must but at this stage I'm learning so spend so much on a bit of kit I am unlikely to use is pointless.
I found a great alternative on ebay however, a two year old lenovo thinkpad t410. Now thinking two year old laptop is out of date already but this is an ex business lease laptop so has 128gb ssd, 8GB ram and around 5ghz from its processor.
This lead me on to my next series of posts, I'm going to review some code editors.
Stay tuned!
Monday, 2 June 2014
Update
Just a quick unedited post of text to let you all know I'm back in the game.
After a few weeks of different issues, arising I'm know back putting more effort into my coding and my raspberry pi.
First project is to sort this print server out!
After a few weeks of different issues, arising I'm know back putting more effort into my coding and my raspberry pi.
First project is to sort this print server out!
Friday, 16 May 2014
Bootstrap
This used a new element called Bootstrap. For those of
you who don’t know it’s a CSS framework that allow functions to be created
faster.
Interesting element I’m going to use it in a codebit I have
on codecademy at the moment.
Come check out my profile if you want.
Wednesday, 14 May 2014
Project
Been away for a while, unfortunately my grandmother died that
put dampener on everything of the last couple of week. But on to my project.
Currently I am a customer advisor in the motor trade. Been in
the motor trade now for too long but an project idea came to me today.
The company I work for has a DMS or Dealer Management System
operating pretty much everything we do from invoice to vehicle history, CRM and
new car sales all through this system.
Its great for the accountant but for us minions its after
through products bolted on to this amazing package.
I thought could I build a simple website to do the basics of
what I want.
I have customer records that I need to send an email to
after every booking. However we can’t create an option to automate this so I have
to copy paste a word document into a blank email, adjust the info for specific
customers then send it.
I’m looking for a solution. I'm think a web form that we use as a booking prompt that emails the customer directly. we'll see.
Tuesday, 29 April 2014
Command line
I posted an article called “How I Taught Myself to Code in
Eight Weeks”.
I have been reading this article and working through it. I’m
at stage two or Learning Python the hard way. First I’m working through the
command line crash course as my use of the command line is limited to my
raspberry pi. Using line I have copied from tutorial from the internet and to
be honest to not much success.
Currently learning about directories and their relationship
with GUI and CLI and enjoying it to be honest. Not being an area I’m strong I like
spreading my wings and learning new part of how things work.
Not quite feeling the eight weeks thing but I suppose if you
have nothing else to do you could do it.
Friday, 25 April 2014
How to Turn a Raspberry Pi into a Google Cloud Print Server - My findings
Not very successful!
(Side note: while I was searching for the url for that link I noticed how messy it look when I copy and paste articles in. Sorry about that!)
I followed the process until I got to “add printers” but it doesn’t
recognise my printer. So played about with it for about an hour. Disconnecting,
reconnecting, reboot, power on, power off etc etc etc. Nothing worked.
I found another guide that was different but this ask me to
go to a web page to setup up CUPS but this wouldn’t work.
So this is now my number one project! Get this working! Wish
me luck!
Thursday, 24 April 2014
How to Turn a Raspberry Pi into a Google Cloud Print Server
This is the article I spoke about in my last post. Interesting , very simple!
NOT MY WORK! see the end of the post for the author name and details about him.
How to Turn a Raspberry Pi into a Google Cloud Print Server

Google Cloud Print is a fantastic way to link your printers to the cloud and enjoy print-from-anywhere access, but there’s a catch. If you don’t have one of the recent Cloud-Print-Ready printers, you need to leave your computer on to enable remote access. Read on as we configure a tiny, energy-sipping Raspberry Pi for the task.
Why Do I Want to Do This?

We’ve shown you how to enabled Cloud Print on your mobile devices and even use third-party tools to add it... [Read Article]
The first situation is ideal, as the printer itself connects directly to the cloud and there is no need for an intermediary. Barring that, however, it should be your goal to make sure the intermediary is wasting as few resources as possible. Leaving a desktop computer on 24/7 for the sole purpose of functioning as a Cloud Print server is a whole lot of resources for a job that requires very little horsepower.
In order to cut back on the resources wasted, we’ve opted to turn a tiny, low-power Raspberry Pi device into an ultra lightweight Cloud Print Server. The best part about this setup is that the Raspberry Pi can continue to perform other roles. For example, our Raspberry Pi Cloud Print Server is also the same device functioning as our Raspberry Pi Weather Indicator. It takes so few resources to do both jobs (spool up the occasional print job and run a simple script to check the weather and toggle an LED) that there’s no reason to not stack the tasks and get more out of our Raspberry Pi purchase. Here are some of the projects that you could easily stack with a Raspberry Pi Cloud Print Server:
- Build an LED Indicator with a Raspberry Pi (for Email, Weather, or Anything)
- How to Turn a Raspberry Pi into a Low-Power Network Storage Device
- How to Turn a Raspberry Pi into an Always-On BitTorrent Box
- How to Install NZBGet for Lightweight Usenet Downloading on Your Raspberry Pi
What Do I Need?
For this tutorial, we are going to assume that you already have the following:
- A Raspberry Pi with Raspbian installed
- Printers accessible to the Pi
- A Google Account

Even though computer printers are relatively ubiquitous, you can’t just go pull one off the shelf and be guaranteed a... [Read Article]
In addition, you’ll likely find it helpful to check out our guide to Google Cloud Print to familiarize yourself with the ins and outs of the system.
Installing Chromium
The secret sauce in our Raspberry Pi as Cloud Print Server model is the open source browser Chromium. One of the official ways to add Cloud Print capability to a PC is to use Google’s Chrome web browser as a print server. Unfortunately, even though there is an official Chrome release for quite a few distributions of Linux, it only supports x86/x64 architecture and not the ARM-based architecture that powers the Raspberry Pi and Rasbian. This is where Chromium comes in, as we can still access the relevant features in Chromium that we need to link our Raspberry Pi to Google’s Cloud Printer system.
To get started, open up the terminal on your Raspberry Pi and enter the following command:
sudo apt-get install chromium-browser
When prompted, type Y and hit enter to continue the installation. The installation isn’t enormous, but it’s big enough; a ten minute trip to the break room to grab a cup of coffee is certainly a reasonable way to kill the installation time.
Once Chromium is installed, we need to launch it from the desktop environment. You can find it in Raspbian’s start menu under Internet -> Chromium Web Browser:

After launching Chromium, navigate to the menu icon in the upper right corner, click it, and then select “Settings”. Scroll down in the Settings window until you see “Advanced Settings” and, after clicking that, continue scrolling down through the expanded settings options until you see the entry for Google Cloud Print:

Click “Add Printers”. You’ll be kicked over to an authorization page like so:
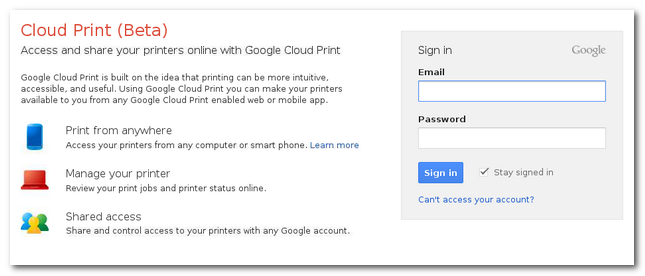
Fill in the Google account credentials of the account you use to manage your Cloud Printers. Make sure “Stay signed in” is checked, since this is going to be a stand alone print server we don’t regularly interact with.
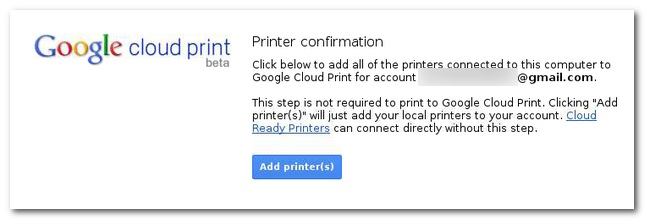
After authorizing your account, you’ll see the “Add printer(s)” button. Whichever printers the Raspberry Pi has access to (be they local or networked) will be added to your Google Cloud Print account. If those printers were previously added by some other means, you’ll want to visit your Cloud Print management page to remove the older entries.
After clicking the Add button, you’ll see a confirmation page indicating that the printers were added and you’re ready to start printing. Now is a perfect time to fire off a test print:

Roughly 10 seconds or so after we fired off the print job, it spooled up on the networked printer:

While we initially had concerns that the Cloud-to-Pi-to-Printer workflow would be slow (not that blistering speed is really that critical in most printing situations), those concerns have never been validated. Even with larger PDF files, the process is only marginally longer than your typically lengthy printing-a-big-PDF wait.
After running your test print, you can close Chromium on the Pi as the print server will continue to run in the background. Now you can enjoy print-from-anywhere convenience for around a quarter a month (the Raspberry Pi consumes so little energy that the average annual operating cost is around $3).
Raspberry Pi
The
last few weeks have been manic! Children’s birthday, other kids parties,
Easter holidays, Work and Home life just mental. But I can see the lights at
the end of the tunnel.
My
other half signed up for a month free trial of Netflix yesterday so the kids
could watch some films. So I set up my PlayStation 3 up to the TV in the living
room and gave it a whirl.
I
don’t want my PlayStation in the living room so this made me think. I can watch
Netflix on my iPad if I could watch my iPad on TV then we sorted. Enter the Raspberry Pi.
There
quite lot of people using the raspberry pi to play HD quality video as Media
player etc. An operating system design for called RaspBMC seems to be the
answer as it has the functionality to accept airplay which I could stream too.
Other
use I have for my Pi is a print server. As I don’t have my printer connected
directly to my PC as my PC is for gaming and not a lot else, we get it out,
connect it to the laptop, print and put it away again. But if I could connect
it to the Pi permanently and leave it on, we could just send print to it
directly without having to move it every time.
I’ll
post an article I just read about linking it to Google’s CloudPrint. Be very
useful if it works.
Monday, 7 April 2014
How I Taught Myself to Code in Eight Weeks
Interesting article I read on LifeHacker.
How I Taught Myself to Code in Eight Weeks

 SEXPAND
To a lot of non-developers, learning to code seems like an impossibly daunting task. However, thanks to a number of great resources that have recently been put online for free— teaching yourself to code has never been easier. I started learning to code earlier this year and can say from experience that learning enough to build your own prototype is not as hard as it seems. In fact, if you want to have a functioning prototype within two months without taking a day off work, it’s completely doable.
Below, I’ve outlined a simple path from knowing nothing about software development to having a working prototype in eight weekends that roughly mirrors the steps I took.
Introduce Yourself to the Web Stack (10 Minutes)
The presence of unfamiliar terminology makes any subject seem more confusing than it actually is. Yipit founder/CEO Vin Vacanti has a great overview of some of the key terms you’ll want to be familiar with in language you’ll understand.
Get an Introductory Grasp of Python and General Programming Techniques (1 Weekend)
- Learn Python the hard way: Despite the title, the straightforward format makes learning basic concepts really easy and most lessons take less than 10 minutes. However, I found that the format didn’t work as well for some of the more advanced topics, so I’d recommend stopping after lesson 42 and moving on.
- Google’s Python class: Read the notes and / or watch the videos and do all of the associated exercises until you get them right—without looking at the answers. Struggling through the exercises I kept getting wrong was the best learning experience. I would have learned far less had I just looked at the answers and tried to convince myself that I understood the concepts.
These two resources are somewhat substitutable and complementary. I recommend doing the first few lessons from both to see which you like better. Once you’ve finished one, skim through the other looking for concepts you aren’t fully comfortable with as a way to get some extra practice.
Get an Introductory Understanding of Django (1 Weekend)
- Work through the Django tutorial.
- Delete all your code.
- Work through the tutorial again, from scratch.
The first time I went through the tutorial I inevitably ended up just following the instructions step-by-step without really understanding what each step did since everything felt so new.
The second time through I wasn’t as focused on the newness of the concepts was better able to focus on understanding how all the parts work together.
Get a Deeper Understanding of Python/General Programming Concepts (2-4 Weekends)
- Udacity’s intro CS class: Udacity’s courses are generally 7 session classes (2-3 hours per session) that you can at your own pace. (I’m a huge fan of Udacity’s pedagogy and recommend the intermediate programming class or the web development class as follow-ups to this two-month curriculum.)
- Unit 1 of MIT’s intro CS course: Really well taught and surprisingly approachable.
Again, I would sample each and see which you like the best. I ended up doing both but that was probably overkill.
Practice Building Simple Web Applications (1 Weekend)
- Work through a few of the exercises in Django by example. These exercises don’t hold your hand quite as much as the Django tutorial but they still provide a fair bit of guidance so I found it to be a nice way to start taking the training wheels off.
Build Your Prototype (1 Weekend)
- Build a prototype in just one weekend? Yes, you’ll be embarrassed by what it looks like (I sure was) but that’s the whole point.
That’s it. Eight weekends (or less) and you’ve gone from zero to a functioning prototype. Not so daunting after all is it?
Author's Note: It goes without saying that there's a huge difference between the relatively cursory amount of knowledge needed to build a simple prototype (the focus of this post) and the depth of knowledge and experience needed to be a truly qualified software engineer. If you want to learn all that it takes to build modern web applications at scale, getting professional web development experience at a fast-growing startup like Yipit is a great next step. If you’re smart, hard-working, and passionate about creating amazing consumer web experiences drop us a line at jobs@yipit.com—we’re always looking for great people to join our team.
How I Taught Myself to Code in 8 Weeks | Yipit Django Blog
Subscribe to:
Comments (Atom)